RESTful Engine API Tutorial: Constructing Simple Request Bodies Using Hosted Templates and Datasource Files
Now that you have sent your first template for processing and retrieved the completed document, we will step through putting together a request body with another template and data source so you can feel more comfortable doing this for your own templates and data sources later. In this tutorial, we will host our data file and template on an online object storage platform like AWS S3. We have our template and data file hosted on AWS S3.
Just for your reference, here is a template version of the JSON request body we will be using:
{
   "OutputFormat": "string",
   "ConnectionString": "string",  // When hosting a template, we will populate the "ConnectionString"
   "Datasources":
   [
       {
           "Name": "string",
           "Type": "string",
           "ConnectionString": "string", // When hosting a data source file, we will populate the "ConnectionString"
       }
    ],
   "TrackImports": false,
   "TrackErrors": 3
}
You can also download the template request body as a file here: templatedRequestBody.json
Clicking on the link above will open the file in your browser. Make sure to save the file to your machine (CTRL+S).
Note that the template request body above does not contain all possible values and configurations that our engine offers, but the basic values you will need to run a simple template with one data source.
Request Body Using Connection Strings
Download the provided "templatedRequestBody.json" and open it in a text editor
- Any text editor will work but in the long term we recommend using Visual Studio Code as it is a lightweight editor that will help with the formatting of the JSON in the request body
We will now begin replacing the "string" placeholders in the request body with the values we want:
First we will set the output format. The RESTful engine supports a handful file formats that you can choose to output in. For this tutorial we will use PDF. So in the request body set the
"OutputFormat"value to"pdf". For a full list of output formats, check out the template object in our API reference.Next we will set the
"ConnectionString"to"https://wnd-unittest-resources.s3.amazonaws.com/Test/Manufacturing.docx"In our use case, this is the object link for the document on our AWS S3 bucket.
Now we will set our "Datasources", which is a list of data sources your template needs. So if you have multiple data sources used in your template you will have multiple entries under the "Datasources" entry. For this tutorial, however, our template only requires one data source, so we will only have one entry.
For "Name", we will enter "MANF_DATA_2009".
noteThe data source name is specified during the creation of the template. So when you create your own template and connect a data source to it, you will specify the name then and use that name here when construction your request body.
We offer a handful of data source types that we support for our RESTful engine, for this tutorial we are using an XML data source. So set
"Type"to"xml". For a full list of datasources, check out the template object in our API reference.Next we will set the connection string. For
"ConnectionString", set"https://wnd-unittest-resources.s3.amazonaws.com/Test/Manufacturing.xml". Similar to the template data, since we are providing a connection string for our data, we will not need to populate the"Data"entry and will set it to null in the next step. Only use"Data"if you are not using the"ConnectionString".As explained in step 6, we will set
"Data"tonull.
You have now completed constructing the request body for this template using connection strings. You can test it in SwaggerHub by following the steps for posting and retrieving documents in the previous tutorial. However, instead of executing the provided sample request body provided in SwaggerHub, we will replace it with the body we just created:
- Go through the same steps as in the previous tutorial for using the RESTful engine on SwaggerHub.
- When you get to "step 4" in the tutorial, click "Try it out", then paste your request body in:
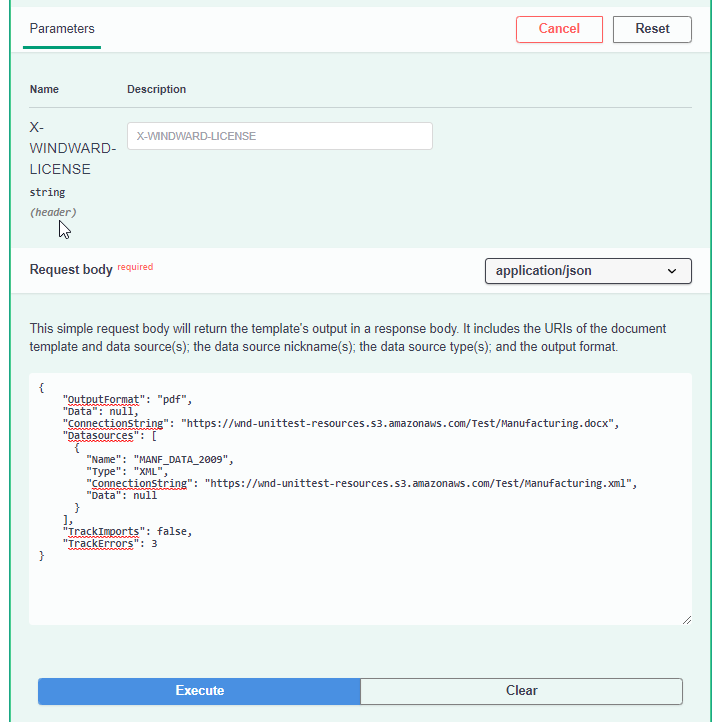
Now you can follow the rest of the steps in the other tutorial to check the status of the document, and then get the document once it is complete.
Next Steps
Now that you have constructed your own RESTful request body using connection strings, and were able to successfully post it and later on retrieve the processed document, consider constructing a request body using base64 data, or setting up your own RESTful engine to do some more of your own testing. If this is something you wish to do, here are some relevant links:
- RESTful Engine API Tutorial: Constructing Simple Request Bodies Using Base64 Encoded Data
- Fluent RESTful OpenAPI Reference
If you are ready to setup your own RESTful engine, check out how to setup your own RESTful engine here: